0
items
Your cart is empty
Subtotal:$0.00
 |
Here is another creative C6 Corvette Exhaust switch for the Z06. Very simple plug and play solution without the need for remotes, car2u, or Homelink. A very simple installation that gives you an OEM appearance when does and complete control over you exhaust butterfly valves. Comes complete with the wiring harness, faceplate and switch already attached to the faceplate. Our new Corvette Z06 exhaust switch plugs right into the exhaust bypass module for a true plug and play installation. You can order it with or without the faceplate (we use the OEM faceplate the is right in front of where your console lid is. Please note the faceplate only is compatible with 2006-2007 Z06's. In 2008 the interior changed so you will need to order without the faceplate and mount the switch somewhere else.
Installation takes 10 minutes...Instructions are shown below...
I N S T A L L A T I O N I N S T R U C T I O N S
102157 Exhaust Valve Bypass Switch – C6 Corvette Z06
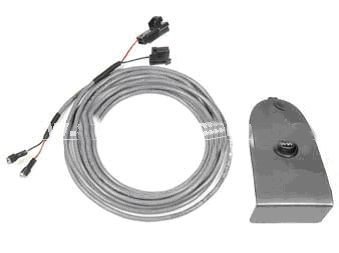
This kit is designed to permit instant manual bypass of the two exhaust valve butterfly valves present in the Z06 muffler, giving the driver full control of maximum exhaust flow. The 102157 is a Plug-And-Play design which should take the average person around 20 minutes to install. (NOTE: Kit is also available WITHOUT switch plate, Part Number 102158 intended for those who want to mount the switch in an alternate spot). There are no wires to cut, and no electrical skills
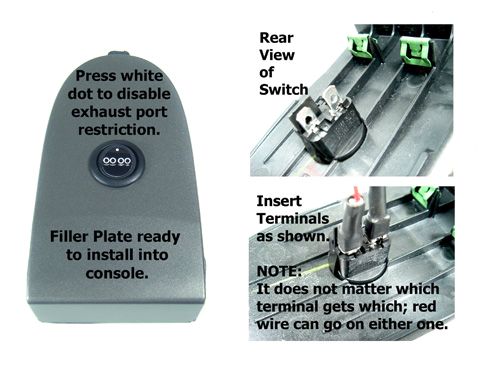
are necessary to install this system, which comes with the console cover plate to replace your OEM part. The switch used has a small logo identifying four exhaust ports. When the switch is pressed to the position of the white dot, the exhaust butterfly valves open and remain on manual override until the switch is returned to the normal position.
To Install:
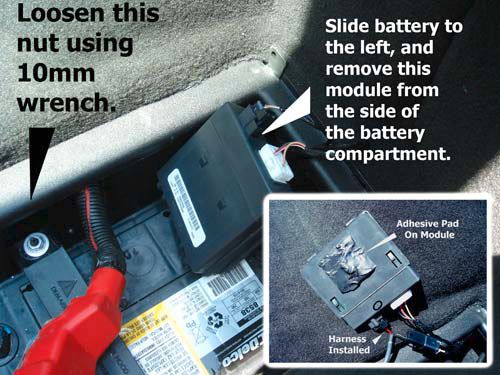
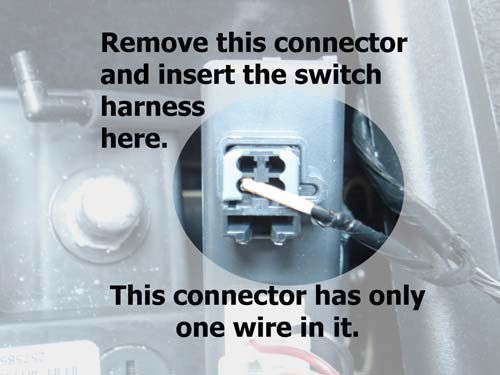
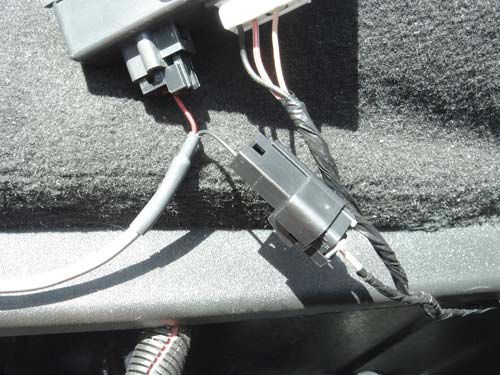
Start at the rear of the car at the battery box located inside on the right rear. Remove the battery box cover to expose the battery. Using a 10mm socket wrench, loosen the battery hold-down bracket and slide the battery to the left to access the right side of the compartment. You will see the Bypass Module located on the right side, secured by a strip of body adhesive. Simply grasp the box and pull it out of the compartment, revealing the two connectors. You will then disconnect the smaller of the two connectors (the one with the single wire) by depressing the lock tab and pulling it out of its mating connector in the module. See the illustrations below for details.
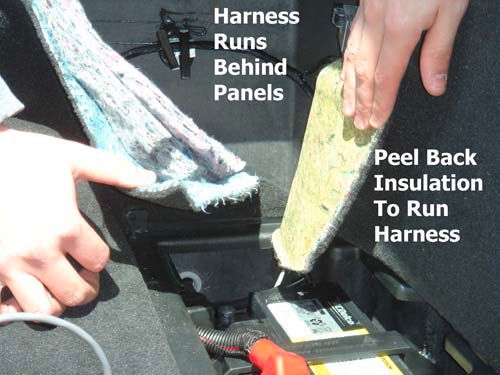
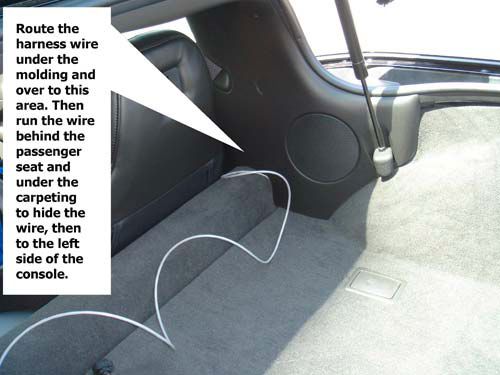
Run the harness from the rear forward, tucking the harness under the carpeted panels along the right side to hide the wires. Follow the upper edge of the panels to the corner where the gas shock is located, then behind the shock mount to the carpeting panel behind the passenger seat. Tuck the harness behind this panel, again hiding the wire. Route the harness over to the drivers’ side of the console and tuck the harness under the edge of the console, routing the end of
the harness up to the section of the console where the plate is located.
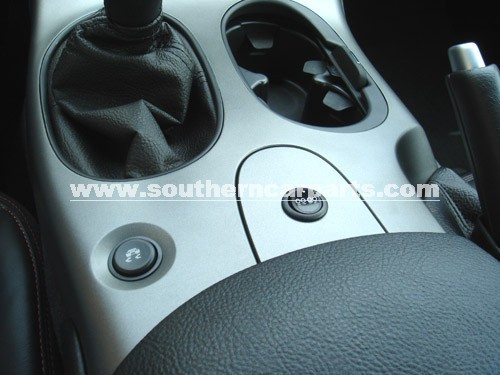
Grasp the lower edge of the plate and pull upward, removing the plate from the console. Fish the wire terminals to that location (notice the sound-deadening foam under the plate). See illustrations below for details. Once the plate is snapped into place, re-insert the module and slide the battery back to its original place. Tighten the hold-down clamp.

Shipping
We utilize UPS, Fedex, and USPS for all of our shipping needs. Carrier choice is based upon availability and needs of the customer and is the sole discretion of SouthernCarParts. We always try to ship within 24 hours of order placement (do to the custom nature of some products, shipping within 24 hours is impossible, actual shipping time frames will be listed in the product description). Please keep in mind that some products such as Custom Fit Car Covers, Lloyds Floor Mats, Painted accessories, and Racemesh Products can take 3 -10 days to ship and are charged at time of order placement. Racemesh products take 4 weeks to ship as they are made to order.
Returns
Should you need to return a part for refund, exchange, or credit, please contact our returns department within 30 days of purchase at orders@southerncarparts.com for a Return Merchandise Authorization (RMA) number. Most problems, such as installation, can be solved with a telephone call (888-631-1433). Southern Car Parts will not accept returned goods without prior authorization and an RMA# written clearly on the exterior of the box. The customer is responsible for freight on all return orders. Parts authorized to be returned, on a non-exchange basis, are subject to a 20% restocking fee. Returns will only be accepted within 30 days of the original date of shipment. Custom painted parts - Once these parts are started, we can refund you less the paint(chemicals) that have been used. Exception is rear spoilers and front splitters, we can refund less 20%.
Custom-made-to-order items are NOT returnable. This includes embroidered floor mats and car covers.
Damages in Shipping
All damages from shipping must be reported to Southern Car Parts within two business days from tracking number delivery confirmation. After two business days, damages become the responsibility of the customer.